In this post, I’ll be showing you an ultimate step-by-step guide to creating free business email accounts using your domain name from your website cPanel. Also, I’ll be showing how to configure it for your mobile devices so you can start and respond to business conversations on-the-go with your business email accounts. But first let me tell you why I’m teaching this.
The first few pitches I made to businesses and brands for Website Design contracts are memories I’ll never forget. Looking back now, they were disastrous but I learnt from them. After cold-calling and sweet-talking prospects over the phone, they would request I send them my email address so they could contact me and that was it. I never heard from them again. Money, time and efforts wasted.
I never knew what was wrong until I placed a bid for a huge contract that could have been my business breakthrough. I lost out again and my contact in the firm reached out to me after the selection process and told me I disappointed her. She asked why I sent in my proposal via my Gmail account and not my business email account. I told her I didn’t see any big deal in it. She went on to tell me that act alone put me in the back-burner for the contract. To cut the story short, I cried my eyes out that night and I’ve since then learnt my lesson.

So if you’re a business owner, creating a custom email address to send proposals, pitches and business-related messages is easy as A, B, C and very cheap. Configuring these email accounts to work with your Gmail and Yahoomail app clients is also easy as 1, 2, 3. I know getting an email with your domain seems like a myth but I assure you it’s not.
In the next few steps, I’ll be detailing how to create business email accounts and also how to configure it for your mobile devices.
CREATING YOUR FREE BUSINESS EMAIL ACCOUNTS
I want to believe we all know how to access our domain hosting cPanel because that’s where we’ll be creating these email accounts from.
- Login to your cPanel (https://www.websiteaddress.com/cpanel) or via your hosting account.
- Scroll down to the Email Section and click on Email Accounts.

- Enter your custom email address. I’m creating test@yeswebsites.com.ng for this tutorial.
- Click the Generate button to generate yourself a strong and secure password. (Ensure you keep the password in a safe place. We’ll be needing the password to configure the email accounts for your mobile devices). I made my password visible in the image so you can see the random string of characters Password Generators produce for passwords.
- Specify the quota you want to allocate to the email account. (Depending on your hosting package, it’s best if you keep it at 250mb)
- Click Create Email. It is optional to check the Send Welcome Email with mail client configuration checkbox. I didn’t check the box so I’ll be having an empty inbox when I access my webmail.
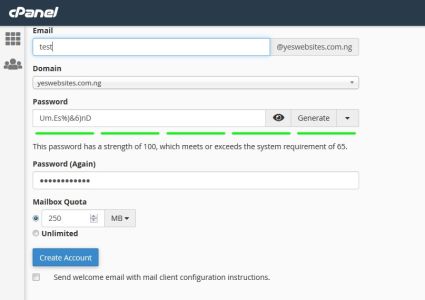
You’ve successfully created your email account.
ACCESSING YOUR BUSINESS EMAIL ACCOUNT
- Click on the Email Account you just created.
- To the right of the email account you just created is a list of options, click on Access Webmail.
- Choose one of the Webmail templates as default. For the sake of this tutorial, I’ll be choosing Roundcube.
- Double-click on your preferred template to enter your Webmail.

SETTING UP YOUR EMAIL ACCOUNT CONFIGURATION SETTINGS ON MOBILE DEVICES
The next thing to do is to find out your email account configuration settings so we can use it for setting up our business email on our Gmail and Yahoomail clients. This email account configuration settings vary server to server. Your hosting server has its own servers and this is what they’ll provide you with to setup on your mobile mail clients.
- At the top-right corner of your page, click on your email address to display a drop-down menu.
- From that drop-down menu, click on Configure Mail Client.

- On the next page, scroll down to the Mail Client Manual Settings
- Under that section, copy the parameters shown under Secure SSL/TLS Settings (Recommended) and paste it where it can be easily accessible.

HOW TO SET UP GMAIL TO SEND AND RECEIVE EMAILS USING YOUR DOMAIN NAME
- Load up your Email Client. For this tutorial, I’ll be using the Gmail app on Android.
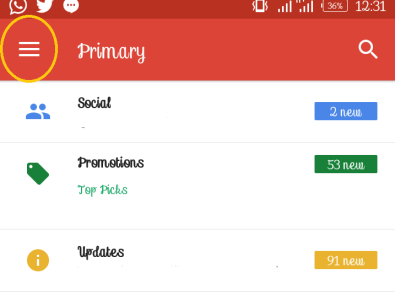
- Click on the 3 horizontal lines at the left-top corner of your app and click Add Account. If you can’t find Add Account, click on Settings then click on Add Account.
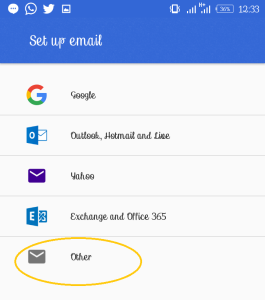
- From the list displayed, click on Other.
- On the next page, enter your business email address you just created.
- At this point, you have 2 options to proceed. You can click on Manual Setup or Next. Because you have come this far in this tutorial, I consider you a professional so we proceed with Manual Setup.
- On the next page, select either IMAP or POP3. For this tutorial, I’ll select IMAP.
- Enter your password and click Next.
- On Incoming Server Settings Page, fill in the appropriate server settings and click Next and wait for it to validate your incoming server settings. If wrong, it returns to the initial page. If yes, it proceeds to the next page.
 On the Outgoing Server Settings Page, fill in the appropriate server settings and click Next and wait for it to validate your incoming server settings. If wrong, it returns to the initial page. If yes, it proceeds to the next page.
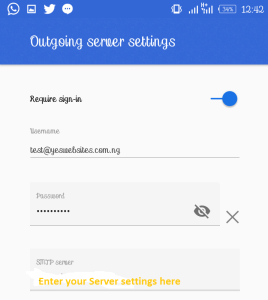
- Wait while it validates your Outgoing Server Settings as well.
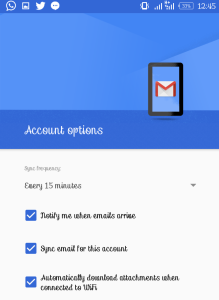
- Now that we’ve successfully setup our Business email on our Mobile Mail Client, configure your Sync Frequency and other options above and click Next and wait for it to finally create the account.
- Setup your Account Name and Your Name as you want to have it shown on your sent messages.
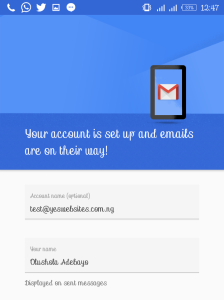
- Click Next and you’re good to go
On other email clients like Yahoo and Hotmail, there are slight differences in these steps but with an understanding of this tutorial, you should be able to setup your custom email account on any mail client provided you have the necessary parameters.
ACCESSING YOUR BUSINESS EMAIL ACCOUNT
Alternatively, your business email account can be accessed via the browser. To access via the browser, do the following;
- Enter https://www.websiteaddress.com/webmail into your browser.
- Login with the email account details (Email address and Password).
You can now access your business email via PC or Mobile browser.
If you found this article insightful, kindly share on your Social Platforms with the Social Buttons up. Also, follow us on Social Media so you can get notified when we publish new posts. Thank you!

 On the Outgoing Server Settings Page, fill in the appropriate server settings and click Next and wait for it to validate your incoming server settings. If wrong, it returns to the initial page. If yes, it proceeds to the next page.